How can Install MongoDB and Create Database?

Hey Guys,

Now it is time to do some fantastic thing, normally connecting to database and retrieving data from database or writing into database is quite interesting if you are working with new platform and tools. Today I want to show you how to connect to the MongoDB and retrieve data (of course I will teach you how to insert first), for a few seconds forget about node.js and focus on MongoDB, in order to create a database in MongoDB we need to follow the below steps:

  1. MongoDB is an open source database which can be downloaded from the: http://www.mongodb.org . So please open the link and download it. For this tutorial we need MongoDB version Windows 64-bit 2008 R2+
  2. If you cannot do it please close the website and turn off your pc and do something else as you are not qualified for developing. (Just kidding) if you have difficulty to download or install, please click here to see the video which I uploaded on my YouTube channel.
  3. After you install, you need to run your MongoDB server, it is very easy.
    1. Please make sure that you created Data folder in your node folder, I created something like this : E:\node\nodetest1\data
    2. Now we want to create database and copy necessarily files into the data folder. Open command prompt and go to the MongoDB bin folder, (if you watch video you can see how I moved to bin folder). For those lazy people that do not want watch video you can find Bin folder in this address:

C:\MongoDB\Server\3.0\bin

After you moved to this folder key in the below command:

mongod –dbpath E:\node\notetest1\data

Note:  dbpath is the address of data folder, so maybe your data folder address is different from mine, please change it accordingly.

Note: In some cases I saw that mongod does not work, so for this case you need to key in the full address of mongod.exe, actually mongod is exe file in bin folder!!!!

Note: it may take a few seconds to a few minutes for command to be finished so please be patient.

  1. After you ran the command you could see a few files and folders are created in Data folder and also in your command prompt window you can see MongoDB is waiting for connection.
  2. It means you are in a right direction and your MongoDB is waiting for connection.
  3. Something like this:
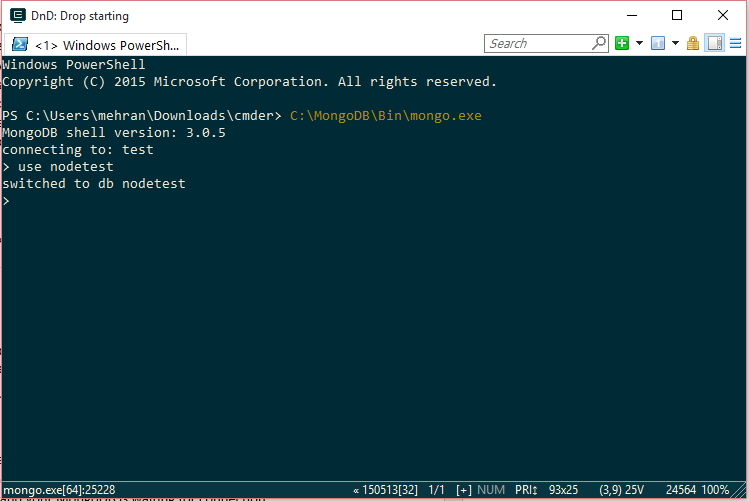
  4. Be default mongoDB is connected to the test database and even you can see the name of test on your screen once you copy all the necessarily  files to the data folder, but do not worry about it, we can always switch to our own database, for this purpose you need to run the MondoShell, to run MondoShell you need to run the below command:

C:\MongoDB\Bin\mongo.exe

After you press enter you can see something like this:

MongoDB Wating for connection

To change the database you can type this command:

Use [name of you database]

Connect to Differtent Database

Mongo DB uses Json data structure to keep data, so before we go further I want to show you how Json format looks like:

{“name”:”Mehran”,”code”:”123”}

{“name”:”Arash”,”code”:”234VF”}

{“name”:”Arman”,”code”:”EDRng”}

Basically json format is very simple and understandable for human.

How can we add record to our database?

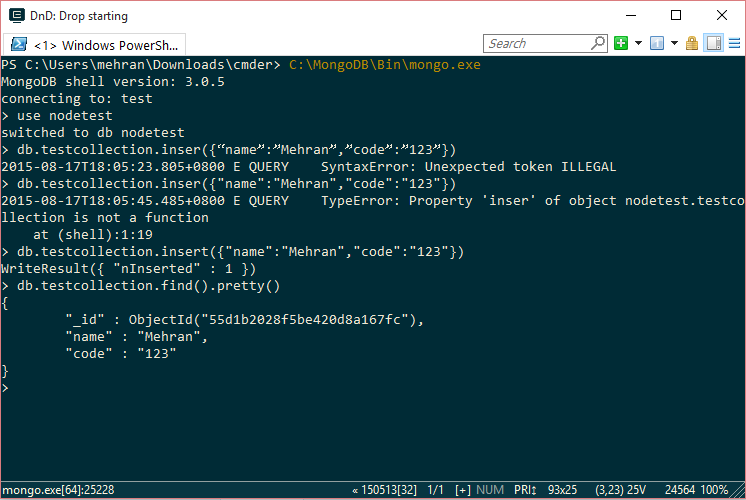
In order to add records to your database you can use the below command:

db.insert.testcollection.insert({“name”:”Arman”,”code”:”EDRng”})

In the above command, testcollection is a user defined name for the collection. It means you can change it as you want. This collection looks like and array and keep all the records. Above command must be ran in mongo shell. (Same as step 5).

How can we retrieve records?

In order to retrieve data you can run the below command:

db.testcollection.find ().pretty ()

Then result is something like this:

{

“_id” : ObjectId(“55d1b2028f5be420d8a167fc”),

“name” : “Mehran”,

“code” : “123”

}

MongoDB use

in the next post I will teach you how to retrieve data from MongoDb and show it Html file by using Node.js.

bye bye 🙂

Advertisement

Why Node.Js? install express,Mongo DB and Jade

Hey Guys,

In this tutorial I want to show you how we can convert Node.Js to a web-server or even more. To do this conversion you need to install express, and also you need to do a few things:

run you command prompt and follow the steps:

  1. Create a directory for Node.js project

E:/mkdir node

2. now you need to install express, please use this command:

E:\node>npm install -g express-generator

3. Create a simple project in your node directly that you created in step 1

E:\node>express nodetest1

4. if you go to that folder you can see a few files and folders are added, this is simple project which is created for us and we want o change some of the configurations. if you open the node folder you can see the package.json, this json file contains list of dependency packages that are needed for this project. if you open the file in any text editor you can see something like :

{
“name”: “nodetest1”,
“version”: “0.0.0”,
“private”: true,
“scripts”: {
“start”: “node ./bin/www”
},
“dependencies”: {
“body-parser”: “~1.12.4”,
“cookie-parser”: “~1.3.5”,
“debug”: “~2.2.0”,
“express”: “~4.12.4”,
“jade”: “~1.9.2”,
“morgan”: “~1.5.3”,
“serve-favicon”: “~2.2.1”
}
}

we only need to add a few items to the dependencies, as I want to show you how to use mongoDB in node js, so we need to add mongoDB dependency to this file. Please change the dependencies section like this:

“dependencies”: {
“body-parser”: “~1.12.4”,
“cookie-parser”: “~1.3.5”,
“debug”: “~2.2.0”,
“express”: “~4.12.4”,
“jade”: “~1.9.2”,
“morgan”: “~1.5.3”,
“serve-favicon”: “~2.2.1”,
“mongodb”: “~2.0.33”,
“monk”: “~1.0.1”
}

5. Next step is to install all dependencies that are mentioned in the package.json. run the command prompt and execute the below command:

E:\node\nodetest1>npm install

6.Once you install everything, you need to create a data directity in node folder, the reason that we need to create data folder is that we want to user mongoDB and we already installed dependency for mongoDB, so without data folder you will face with error 🙂 , so easily run this command in command prompt:

E:\node\nodetest1>mkdir data

7. Now everything is ready to run the Node.js, to run Node.js  you can execute the below command:

 E:\node\nodetest1>npm start

8: To see the result of what have done in this tutorial type this address in browser:

http://localhost:3000

Maybe you are still a bit confused about node.js, but do not be please, it is very normal specially for those programmers that are not familiar with these kind of coding and environments. we just started and you need go through the whole training to understand what exactly is happening. 🙂

Bye bye

Why Node.js?

Hey Guys,

I decided to start a tutorial about node.js. I know sounds is boring because there are plenty tutorials outside which can help you to learn. but in this tutorial I want to start differently. I want to start developing a real application. but we start it slowly and I will try to post  a few times per day. before we start lets say why node.js ?

My answer to this questions is : because node.js is very cool. hahaha… but if you really want to know why node.js,  you can look at this web page, this is a really good explanation about node.js

Why node.js?

Any way, after you read Why Node.js, please do not waste your time to search about it. if you really want to know more about it, you only have one choice:

  1. Move your ass and work on it … hahahah

How we can install Node.Js?

Ok, this a first question that you may ask and it is right question. to install node.Js, Please click Node.Js  and click on the Green INSTALL button ( I hope you can see it there !!!!! 😉  ). Just follow the install instruction and install the Node.Js,

Note: if you do not know how to install this app please turn off your PC and do something else. because installing node.js is as easy as installing Adobe Acrobat Reader 5.5.

How can check whether the Node.Js is installed properly or not?

it is a good questions. to check Node.Js installed properly or not, please open command prompt and type node -v

In response you may get something like this :

Node Version Control

I think for now is enough, I will try to post new things :

Bye bye

How Use Cisco VPN Client on windows 10?

Hey Guys,

I am sure there are plenty users outside that are still using Cisco VPN Client. I should say that by default Cisco VPN Client does not work on windows 10. you may get different errors after upgrade to windows 10. regardless the error that you are getting, please follow the below instruction to run your Cisco VPN Client without any problem.

  1. Remove Cisco VPN Client.
  2. Install sonic64
  3. Restart your Machine
  4. .Install Cisco VPN Client
  5. You need to change some values in registry:
    HKEY-LOCAL-MACHINE/SYSTEM/ CurrentControlSet/ Services/CVirtA
    please look for Displayname ( it is a key in right side panel)
  6. Open the DisplayName and change the value to :
    Cisco Systems VPN Adapter for 64-bit Windows
    by default value maybe be like this :
     %@12393^0TCisco Systems VPN Adapter for 64-bit Windows
    it means you need to remove all extra characters in front of “Cisco Systems VPN Adapter for 64-bit Windows”
    after that you can use the Cisco VPN Client happily.

Note :

  1. Just remove those funny characters in Displayanme not other things.
  2. This solution works for most of the errors that you may get after upgrading to windows 10 but still I cannot guaranty that it works for all.
  3. If you do not have sonic64, please send email to me : janfeshan.mehran@gmail.com, I will try to send it to you ASAP
  4. I suggest you to uninstall Cisco VPN Client before you upgrade to windows 10. it can cause problem in some Machines same as HP Omen.

I hope this can help you.

Finding the user’s current region using RegionInfo in .NET C#

That’s really Cool !!

Exercises in .NET with Andras Nemes

The CultureInfo object helps a lot in finding information about the user’s current culture. However, on occasion it may not be enough and you need to find out more about that user’s regional characteristics. You can easily retrieve a RegionInfo object from CultureInfo which will hold information about a particular country or region.

You can find the current region in two ways from CultureInfo:

My computer is set to use Swedish-Sweden as the specific culture so I get the following values from top to bottom:

  • Sweden
  • kr
  • Swedish krona
  • Svensk krona

If I change the current culture to my home country, i.e. Hungary…

…then the values are of course adjusted accordingly:

  • Hungary
  • Ft
  • Hungarian Forint
  • forint

Read all posts related to Globalisation in .NET here.

View original post

How can merge two datatables?

Here I will teach you how can merge two datatables :
You can whatch the video here

 Private Sub MergeDatatable()

        Dim dt1 As New DataTable
        Dim dt2 As New DataTable

        dt1.Columns.Add("Id")
        dt1.Columns.Add("Name")
        Dim dtrow1 As DataRow
        dtrow1 = dt1.NewRow
        dtrow1("Id") = 12
        dtrow1("Name") = "Mehran"
        dt1.Rows.Add(dtrow1)


        dt2.Columns.Add("Id")
        dt2.Columns.Add("Name")
        Dim dtrow2 As DataRow
        dtrow2 = dt2.NewRow
        dtrow2("Id") = 12
        dtrow2("Name") = "Nush"
        dt2.Rows.Add(dtrow2)


        dt1.Merge(dt2)

    End Sub

Click here to convert this Vb.net code to C#