Create and Read Excel File in C#

Hello guys 🙂

It is very common for applications to have import or export in excel format. There are plenty options that you can use to read or write an excel file in .net. Today I am going to introduce you two simple libraries that are open source and can help you in reading and writing excel files in any type of .net applications.


Here is a simple code that create an excel file by using EPPluslibrary, you can download the full source code directly from my git-hub

Before you start coding you need to make sure that you have imported these libraries :


using Excel;
using OfficeOpenXml;
using System;
using System.Collections.Generic;
using System.Data;
using System.IO;
using System.Linq;
using System.Text;
using System.Threading.Tasks;

Creating Excel:


public string CreateExcelFile(DirectoryInfo outputDir)
{

FileInfo newFile = new FileInfo(outputDir.FullName + @"\sample1.xlsx");
if (newFile.Exists)
{
newFile.Delete();  // ensures we create a new workbook
newFile = new FileInfo(outputDir.FullName + @"\sample1.xlsx");
}
using (ExcelPackage package = new ExcelPackage(newFile))
{
// add a new worksheet to the empty workbook

ExcelWorksheet worksheet = package.Workbook.Worksheets.Add("Student Lists");
//Here  column to  the current sheet
worksheet.Cells[1, 1].Value = "Title";
worksheet.Cells[1, 2].Value = "Name";
worksheet.Cells[1, 3].Value = "Family";
worksheet.Cells[1, 4].Value = "Student Code";

//Add value to celles

worksheet.Cells[2, 1].Value = "Mr.";
worksheet.Cells[2, 2].Value = "Mehran";
worksheet.Cells[2, 3].Value = "Janfeshan";
worksheet.Cells[2, 4].Value = "ST54516";

worksheet.Cells.AutoFitColumns(0);  //Autofit columns for all cells
worksheet.HeaderFooter.OddFooter.RightAlignedText =
string.Format("Page {0} of {1}", ExcelHeaderFooter.PageNumber, ExcelHeaderFooter.NumberOfPages);
// add the sheet name to the footer
worksheet.HeaderFooter.OddFooter.CenteredText = ExcelHeaderFooter.SheetName;
//Save and export excel file

package.Save();

}

return newFile.FullName;
}

Reading Excel :


public DataSet ReadExcel()
{
string filePath;
filePath = "C:\\sample1.xlsx";
FileStream stream = File.Open(filePath, FileMode.Open, FileAccess.Read);
IExcelDataReader excelReader = ExcelReaderFactory.CreateOpenXmlReader(stream);
excelReader.IsFirstRowAsColumnNames = true;
DataSet result = excelReader.AsDataSet();
excelReader.Close();
return result;
}

Please contact me if you have any issue with the code.

Why Node.js?

Hey Guys,

I decided to start a tutorial about node.js. I know sounds is boring because there are plenty tutorials outside which can help you to learn. but in this tutorial I want to start differently. I want to start developing a real application. but we start it slowly and I will try to post  a few times per day. before we start lets say why node.js ?

My answer to this questions is : because node.js is very cool. hahaha… but if you really want to know why node.js,  you can look at this web page, this is a really good explanation about node.js

Why node.js?

Any way, after you read Why Node.js, please do not waste your time to search about it. if you really want to know more about it, you only have one choice:

  1. Move your ass and work on it … hahahah

How we can install Node.Js?

Ok, this a first question that you may ask and it is right question. to install node.Js, Please click Node.Js  and click on the Green INSTALL button ( I hope you can see it there !!!!! 😉  ). Just follow the install instruction and install the Node.Js,

Note: if you do not know how to install this app please turn off your PC and do something else. because installing node.js is as easy as installing Adobe Acrobat Reader 5.5.

How can check whether the Node.Js is installed properly or not?

it is a good questions. to check Node.Js installed properly or not, please open command prompt and type node -v

In response you may get something like this :

Node Version Control

I think for now is enough, I will try to post new things :

Bye bye

How can retrieve data from Json source and show them on the page?

Maybe it is very difficult for you to connect to the Json file and retrieve data, today I want to make it easy for you 🙂 Lets start.

Follow these steps:

  1. We need a Json file for the source that produces Json data for us. To make a Json file please follow these steps :
    1. Make a new  text file and copy this information to the file
"one": "Singular sensation",

"two": "Beady little eyes",

"three": "Little birds pitch by my doorstep"
    1. Change the file extension to the Json
    2. Now you have Json file that contains data , please copy the file in your project ( I assumed you are working in Visual studio )
    3. There two types of instructions that you can follow to read a Json file , Today I want to use $.getJSON (This a JQuery function)
<script>

    $(document).ready(function () {

        $.getJSON("Data/info.Json.", function (data) {
        var items = [];
        $.each(data, function (key, val) {
            items.push("<li id='" + key + "'>" + val + "</li>");
        });

        $("<H1>", {
            "class": "my-new-list",
            html: items.join("")
        }).appendTo("body");
    });
    })

</script>

GetJSON hast two parameters

  • Source of JSON , it could be URL or the address of JSON file
  • The function that gets data from JSON source

        $.getJSON("Data/info.Json.", function (data) {

4.  Then we should add data to the array


        $.each(data, function (key, val) {
            items.push("<li id='" + key + "'>" + val + "</li>");
        });

</script>

5.  And in the last step we should add the HTLM codes that we generated in the previous step to the body tag.


        $("<H1>", {
            "class": "my-new-list",
            html: items.join("")
        }).appendTo("body");
    });

And do not forget to add JQuery reference to your code , it coule be like this :

<script src="~/Scripts/jquery-ui-1.8.20.js"></script>
<script src="~/Scripts/jquery-1.7.1.js"></script>

What is JSON ?

JSON (JavaScript Object Notation) is a lightweight data-structure format for data interchange, JSON could be read by human and it is easy for machine to generate and pars it.

When should we use JSON?

Assume you want create a service that retrieve data from DataBase and send them to the client. What will happen if your client use different type of machines and platform same as Smart phone, PHP website, ASP.net Website, different type of operating system. There are two solutions:

  1. Create different services for different machines and platforms (is it economic?)
  2. Create a service that produces a global output that is readable by different machines and platforms.

I am sure you are agree with me that the second solution is more logical.

In my opinion WebAPI could be a good choice for our scenario because, it can produce JSON output that is readable by all machines and platform and also it uses HTTP to transfer data that, also this protocol is well known for all.

Today I am just going to show you how you can create a simple JSON data structure but, In the future I will show you how create a WebAPI and call it by JQuery.

This is simple JSON sample, I declare an employee array that can carry different employees’ data.

{
"employees": [
{ "firstName":"Mehran" , "lastName":"JN" }, 
{ "firstName":"Arman" , "lastName":"Nas" }, 
{ "firstName":"Farzam" , "lastName":"ABS" }
]
}

I am going to do it in a JavaScript code:

<!DOCTYPE html>
<html>
<body>
<h2>JSON Object Creation in JavaScript</h2>

<p>
Name: <span id="Name"></span><br>  
Family: <span id="Family"></span><br> 

</p>  

<script>
var JSONObject = {
  "Name":"Mehran",
  "Family":"Jan"};
document.getElementById("Name").innerHTML=JSONObject.Name  
document.getElementById("Family").innerHTML=JSONObject.Family 

</script>

</body>
</html>

What is NuGet and How does it work?

NuGet is a package-management system for .NET and Visual Studio. Take a look at this scenario:

You want to add JQuery library to your project, so you will follow these steps:

1. Go to www. JQuery.com and download the latest Version of JQuery.

2. Unzip the packages

3. Add it to your project

You should follow these 3 steps to add any free package to your project meanwhile, the most time it is not as easy as JQuery package. I am sure that you have faced with so many errors during adding packages and references to your project. The other important issue is that, how you can trust the packages, especially ZIP packages because they may contain viruses and marvels.

The other problem that will be happened after adding references is, how update these packages? How can find the latest version? How can replace it with old version?

These are the problems that you may be faced during manual adding references. NuGet has solved the problems. NuGet is a places that you could find the latest free packages and add them to your project or get the latest update for current references.

For those who use Visual Studio 2010:

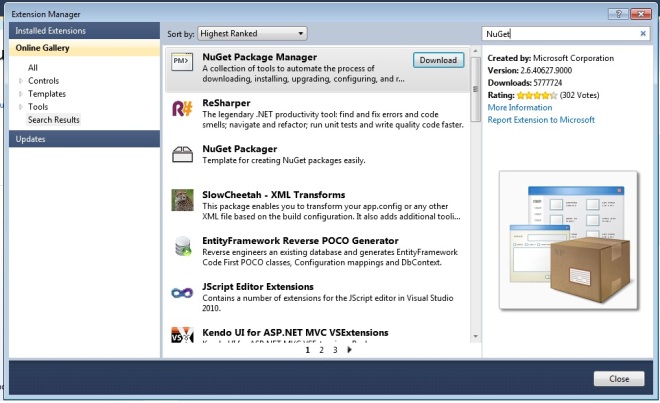
By default the 2010 version of visual studio does not support the NuGet, so first you should  install the NuGet extension, please follow these steps:

  1. Select tools menu
  2. Select Extension manager
  3. In the Extension manager page , search NuGet and the download it ( take a look at following screen shut)

NuGet

Let start Using NuGet to add JQuery to your project:

  1. In the solution Explorer panel right click on your References and select Manage NuGet Packages.
  2. In the Mange NuGet Packages first click on the online (left panel) then type the JQuery on the search box (right panel) after some seconds you will see the list of items that is related to your search (middle panel). Select JQuery and press Install button.

The latest JQuery is downloaded and added to your project.in the next post I will teach you how to update your current references via NuGet.

What is Routing In MVC and how does it work ?

Hello everybody , Today I am going to talk about MVC-routing , if you are a ASP.net developer , you know that how it is easy in ASP.net to make a page as a startup page, just you need to right click on a page and choose “Set as start page”. But the story in MVC is totally different because, you cannot access pages directly, you can just access and call methods, YES IT IS!!! It means the first page of your project that will be displayed after running the project is a view page that is made for a function. But you cannot start view directly, you should call the function.

www.mysample-mvc.com/home/index

Take a look at the above URL, it has three parts

  1. www.mysample-mvc.com(domain)
  2. Home ( name of controller)
  3. Index ( name of function)

As you see I do not mention any page in URL address, just I mention controller and function name, but in ASP.net you should mention the name of page same as this example:

www.mysample-mvc.com/home.aspx

Now the question is that how we can change the startup page. For this purpose please expand App-Start folder (kindly find it in main root of your project) and the open RouteConfig.vb, You will see this code there:

 public static void RegisterRoutes(RouteCollection routes)
        {
            routes.IgnoreRoute("{resource}.axd/{*pathInfo}");

            routes.MapRoute(
                name: "Default",
                url: "{controller}/{action}/{id}",
                defaults: new
 { controller = "Home", 
action = "Index", id = UrlParameter.Optional }
            );
        }

Please take a look at URL section it is look like this:

 url: "{controller}/{action}/{id}",

This part tell the system that all URLs should have three parts

  1. Controller ( name of controller )
  2. Action( name of function that you want to be run )
  3. Id ( parameters that will be passed to the function)

You may ask if your function does not have any parameter, why you have to pass ID. You are right if the function does not have any parameter you do not need to pass any Id or parameter because we will consider it in the next line of code:

defaults: new { controller = "Home", action = "Index", 
id = UrlParameter.Optional }

As you see URL is an optional parameter not mandatory.

Now everything is ready for you to change the startup page of your project, you just need to change the name of controller and action (function) in this line of code as you want:

  defaults: new { controller = "Home", 
action = "Index", 
id = UrlParameter.Optional }

How can make custome validation in MVC?

As you know there are lots of default validators in MVC same as Range, Requires and etc… But you may need to create your own validators for special purpose. Today I will show you how to create your own validator.

Let start, I want to make a validator that checks the string input and if the string contains these two characters “(“, “)”, shows an appropriate message to the user.

First you need to make a class that inherits from the ValidationAttribute and then overwrite the functions :

namespace System.ComponentModel.DataAnnotations
{

   public class CheckContentAttribute : ValidationAttribute
{
public CheckContentAttribute()
:base("{0} Check you input sting , it should not contain these
 two charachters : '(' and ')'")
{

}
protected override ValidationResult IsValid(
object value, ValidationContext validationContext)
{
    if (value != null)
    {
        var valueAsString = value.ToString();
       if (valueAsString.Contains("(")  ||valueAsString.Contains(")"))
        {
            var errorMessage = FormatErrorMessage(
            validationContext.DisplayName);
            return new ValidationResult(errorMessage);
        }
    }
    return ValidationResult.Success;
}
}
}

And now you can use this validator :

 public class Info_AdminUsers
    {
        public int Id { get; set; }

        [Required]
        [CheckContent()]
        public string UserName { get; set; }

        [Required]
        [StringLength(160,MinimumLength=3)]
        public string Password { get; set; }

    }

See it is much more easier than you thought , Am I right?